Guest Post: Flow Solves Chicken vs. Egg Problem

I am pleased to present a guest post from Michael Kolodner. Michael is a self-taught Salesforce admin, a competitive saber fencer, and the keeper of four backyard chickens  Three years ago, Michael recommended Salesforce for a CRM in a young organization, mainly because of the ten free licenses. Later, Michael consulted to a sister organization that wanted to implement their own Salesforce database, building that one from scratch on the NPSP. Michael now is the Systems Administrator for Spark, an education nonprofit with 50 users and a much larger database. He is interested in growing his skills and becoming certified soon! He’s working to pay back the great help he’s gotten on the Hub by answering others’ questions whenever he can.

Michael shared his quest on the Power of Us Hub, and like any proud and wise hubber, agreed that these trial-and-error processes that end in successful automation ought to be shared. Take it away, Michael!

The other day I started in on what looked like a simple task: Build a Process that will create two records (Student Nomination and Report Card) when a student (Contact) is enrolled into a program and has evaluation consent. Even allowing for the fact that I just listed three custom objects and a custom field on Contact, I bet you understood the gist of that request. And it sounds simple, right?

Just you wait. It’s still going to sound simple for a sec while I let you know about my organization and my Salesforce instance.

Spark is a national nonprofit that re-engages underserved seventh and eighth grade students, keeping them on track and ready for success in high school and beyond through workplace-based apprenticeships that uniquely combine mentoring, project-based learning, skill building and career exploration. We use Salesforce to keep all of our program data and development data–to run the whole shebang, truly!

As it relates to this blog article, you need to know that:

  • Students are a record type of Contact. (Actually, you didn’t really need to know that. And you’d probably figured it out. OK, moving on…) The evaluation consent custom field is a checkbox indicating whether or not we have gotten consent from the student’s family to use their data (grades, etc) in our impact studies. The fact that it’s a checkbox is all that will be on the test that follows this article.
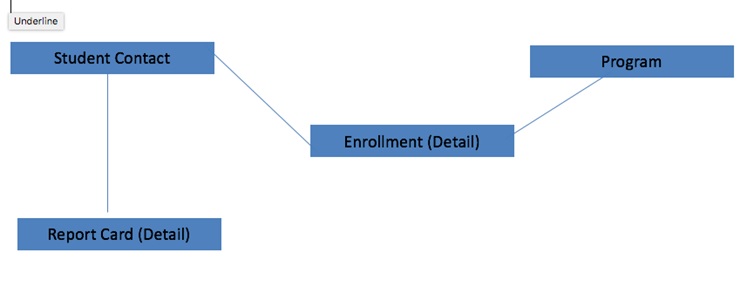
  • Enrollments is a custom object that indicates when a student is part of one of our programs at a school. The Enrollment links the Contact to the Program. Creation of an Enrollment object is the moment at which, as far as Salesforce is concerned, a student has been accepted into Spark’s program at their school. Enrollments are detail to both Contact and Program.
  • Student Nominations is a custom object that holds data about why the student was recommended for Spark (attendance info, social and emotional measures, etc). We used to get them as our first introduction to a student, but now we get a student’s paper application and then hear from their teachers about them, there is no separate nomination form. These are a detail object to Account.
  • Report Cards is a custom object designed to hold grades and data when we get it from the school district. These are a detail object to Contact.

data model

When a student is enrolled, I wanted to create empty shells of those two objects that could be filled later when we get data for students.

So… Simple, right? Just make a Process that fires upon creation of an Enrollment. The criteria will be that the related Contact has True in the evaluation consent field. Then the action will be that it creates two records: a Student Nomination and a Report Card. Getting slightly more into the weeds, we want to make sure we create those two records of the proper record types and that we fill in a couple of fields, like relating said Report Card to the right Student.

Easy peasy! I created my Process. And, sure enough, it fires just fine and creates a Nomination and a Report Card. And, having put the Student on each one, they show up in related lists on that student’s Contact record.

It’s what I realized next that sank me: There is also a lookup on the Report Card to the Student Nomination and vice-versa. It didn’t take me long to realize that filling those in was going to be a bit of a problem. My Process can’t fill them in right away because neither object exists yet for my Process to grab its record ID.

Still, I wasn’t fazed. I’ll just build two more Processes. (There’s nothing you can’t solve with more Processes, am I right?) Each would fire on creation of the record (the Report Card and the Student Nomination) and then fill in the record ID of the created record on the lookup field of the other one.

no dice.jpg
No Dice.

I immediately got an error that “The flow failed to access the value for myVariable_old.nominationform__r.Id because it hasn’t been set or assigned.” You see? The ID still hasn’t yet been assigned because even my new Processes are running before record creation has actually finished. That’s when I turned to the HUB for help. Great resource, that. Smart people, helpful, and fast. Sadly, that’s where I learned that you can’t control the order or timing of processes.

The path forward was a Flow.

flow
But don’t worry – not nearly as complicated as this!

I’d done the Trail on process automation. (You do know about Trailhead, right? Tons of totally free interactive Salesforce training!) And I looked at the Flow designer workbook. But this was basically uncharted territory for me.

The first key to working with Flows, I quickly learned, is that you have to be organized up front. And even if you’re a declarative (or “button click”) Admin like I am, you have to at least pretend to think a little like a programmer. (Don’t worry–we’re just going to pretend!)

What I mean is that we’re going to have to define a handful of variables to use as we step through our Flow. Unlike in a Process where you can look up an object or field at the point you need it, in Flows you have to define a variable to represent that object or field and then point to that variable at the point you need it. These variables get created on the Resources tab (1) and, once defined, show up on the Explorer tab (2) of the interface.

resources tab

explorer tab

You can create those variables later in the process, but you’re a little bit in danger of losing your place as you do so. I recommend thinking through the variables you’ll need at the beginning and setting most of them up right away.

Below, you can see the variable I set up to hold the Contact ID of the student whose record I’m going to want to attach things to. In this case, my Process will actually set the value of the variable. I’ll show you that in a sec.

variable.jpg

Here’s the variable for the Report Card object that’s going to be created in the course of the flow.

report card variable.jpg

For those of you keeping score at home, I needed a minimum of three variables that you’ve probably picked up on:

  1. The Contact ID of the student we’re talking about. (Set by a Process.)
  2. The record ID of the Nomination Tool created during this Flow.
  3. The record ID of the Report Card created during this Flow.

(If you really must know, I also used three more variables, as you may have noticed in my earlier screenshot: the student’s School Name and the name fields for the two objects being created. There’s nothing particularly interesting about those variables and I found them easier to define by putting a formula in the Process than here in the Flow.)

Now let’s take a quick peek at the Process that actually kicks this Flow off. (NOTE: You won’t be able to build the Process until your Flow is finished. But I’m showing you this here for context, not chronology.) The action runs my Flow after filling four variables for me (1-4 on the image). Those are the variables we’re talking about creating right now.

PB.jpg

All right, back over to the Flow Designer.

Here, we come to the part of the Flow building that I would actually say is fairly intuitive. You have a canvass in the Flow Designer onto which you drop your actions and then link them with arrows.

record create report card.jpg

To get that Record Create box, I just dragged the Record Create step into the canvass. Salesforce immediately gives me the record create dialog that I have to fill. Here I’m showing it to you scrolled down so you can see that last step, with the bright red arrow. (The arrow’s not there in Salesforce. But you probably figured that out.) That’s where the creation of this record fills one of my variables with the record ID of the record that was just created. I bet you can already see how that’s going to be helpful down the line…

record create report card 2

I have created the Report Card record and now I need to create the Student Nomination Record, a second step in the Flow. Once that’s done, I will make steps three and four that auto-fill fields on the two records created in steps one and two. I’ll do that by using those handy variables I filled during the record creation steps. Nothing brilliant to see, but here’s one of those update steps. Notice that it uses the variables we defined at the beginning, which have been filled as we went along.

record update put lookups on student record

(Give me a sec, Let me work a bit more… Workin’ on it…

There! I have 4/5 of my Flow laid out. Just now I added the step to update the record that was created at step 2.)

create pre spark report card.jpg

Once I drag down from the little diamond next to the star, I get an arrow to link it to the last step in the chain.

create pre spark report card 2.jpg

And did you notice that little green arrow in the upper right of the first box in my Flow? When you hover over a box, you get options for Edit, Delete, and to set this element as the start of the Flow. (You’ve got to have one set as the start before you save.)

set as start element

That’s really all there is to it. Save your Flow. (Then don’t forget to Activate it.)

flow versions.jpg

Now head on over and create your Process to fire the Flow.

Since you’ve done all this in a sandbox, you can test to your heart’s content. (You ARE working in a sandbox, right?) And when you’re done, upload via Change Set to Production and give yourself an ice cream cone!


Report Subscriptions = Self-Service Email Alerts

“Can I please have an email alert every time X field/record is created/modified?”

This request!!! Ah! Once users begin to fully understand the wonders of workflow rules and email alerts (which is awesome), they may start to make some superspecialsnowflake individualized requests for email alerts (rut roh). Alerts for everyone! On everything!

y92ls

Wait, no. That’s actually a terrible idea. If you start flooding your system with special workflow rules requested for each individual user, you’ll choke up your system in no time. And you’ll have to devote time to testing and tweaking those workflows. If you’re a larger org, it’s probably already general policy that your support team simply turns down these types of requests.

Report Subscriptions came out in Spring ’15, and I spoke at Dreamforce about administrators using them to monitor data quality. Since then, I’ve also begun directing our non-admin users to this handy new feature in place of workflow email alerts, and it’s been a big hit. Why do I love this feature?

Report Subscription Button

07d2b885-87f7-4af0-82e3-951b644556ee1
Scooby loves self-service!

Self-service: Users can set subscriptions up on their own, which means they can edit them to their heart’s delight, set up new ones when they feel like it, and unsubscribe when they’re done. Without ever involving an administrator! High five, fellow admins! It also means that when they leave the organization and their user account is deactivated, those alerts simply go away instead of needing to be manually changed to another user (as is the case with workflows).

Self-service also = administrator time saved: Time saved for me and my co-admins that we’d otherwise need to dedicate to setting up and testing the alert, and then time later on for modifying it, and then even more time when that user leaves the organization and needs to be deactivated, but first they need to be removed from the alert and then we need to find out from their manager if someone should replace them as the recipient. Etc. You’ve been there. Maintaining workflow rules is not simple, and maintaining personalized email alerts for every user is just not a sustainable business practice.

The key to using Report Subscriptions for these types of daily or weekly alerts is to use Dynamic Date Criteria in your filters. Say a user wants to know every time an Opportunity associated to a specific Contact or Account closes. You’ll want to set your Close Date filter to the dynamic ‘Yesterday’ and your alert schedule to ‘Daily.’ That way, on January 29th, they will receive an alert of donations that met their criteria on January 28th, and so on. If donations come in over the weekend, they may need to modify the criteria slightly when they re-run the report on Monday morning. But otherwise, this comes pretty close to perfect! You can similarly use ‘Last Week’ and set your schedule to run weekly.

Report Filter Criteria

Report Subscription Edit

Of course, the criteria in a report won’t necessarily be as granular or detailed as workflow criteria, and you can’t set Report Subscriptions to notify you immediately, the most often you can have it notify you is 1x a day. They cannot replace workflow email alerts for everything, obviously. But they can certainly meet a lot of notification needs for individual users.

My Nonprofit Uses Leads – & So Should Yours!

How do I love leads, let me count the ways.crm-funny1

Before starting at Year Up, I did not understand the depth of what I would learn jumping into a Salesforce org with so very much DATA as this one. Year Up is a successful (and growing) nonprofit organization with 15 sites across the country, attracting the attention of prospective students and prospective employers our interns and graduates. And up until recently, our usage of the Leads object had been minimal.

Why am I highlighting this? Because the places where we have implemented Leads our process has improved and our data has been cleaner. And the places we haven’t? Well, I’ll get to that!

Leads should be the destination for all of the unqualified data about new or prospective constituents (both from users and from your webforms). And you don’t need to be a money-making corporation or a large organization to find Leads useful. I want to talk about two main reasons for this:

  1. Putting a system in place for managing your pipeline of NEW people ensures proper follow through and follow up: Think about it, getting people in the door of your organization is the result of your organization’s success and the hard work of your marketing or communications person or team. Someone believes in your mission and wants to be a part of it! A lot went into someone finding that form and filling it out. The last thing you want is for that person to fill out the form and then get lost in the shuffle of your Contacts, or get a follow up a week or a month after they’ve filled out the form. Leads has some great built-in functionality for managing these records. Set a default owner, set a notification to that person when the lead arrives and then a reminder to follow up. Set up a queue so that if the default owner is on vacation, someone else will be there to catch those new leads.
  2. Avoiding clutter and confusion in your Contacts or other objects keeps your qualified and unqualified data clean, manageable, and separate from one another: Your prospects should be handled differently than people already in your system, right? You don’t want them receiving your organization’s mass emails, you don’t want them confused with an existing donor, and you don’t want your staff running a Contacts report full of people whose sole reason for being there is that they filled out a webform (but have yet to have a real interaction with someone on staff).

Currently, one of the ways we are using Leads is for our prospective employers of our interns and our graduates. The lead form asks for minimal information – all we want is the type of interest, and their contact information. We’ll fill in the details when we do our follow up and have a conversation over the phone.

partner leads

On our roadmap is Leads for our prospective students. Currently, all prospective students automatically become Contacts when they fill out an interest form. That means – you guessed it – that we have a whole lot of prospective student data cluttering global search results, reports, and dashboards. Prospective students all remain in the system for all time. And like other competitive youth programs and educational institutions, many prospects do not move forward in the application process or are not accepted. Going forward, we’ll have prospective students created as Leads instead, putting them into a queue to be responded to by a queue member from Admissions who connects with them by phone and makes sure they follow our standard application process. Once they are enrolled in the program, they will be converted to a Contact.

Keep in mind:

  • Standard lead conversion creates both a new Account and a new Opportunity, which is not always useful for nonprofits. If you are using the Nonprofit Starter Pack, read up on the NPSP’s Lead Conversion Utility.
  • Are you using Salesforce’s new-ish Duplicate Prevention Tool? (If not, you should be!). You can avoid creating duplicate Contacts from lead conversion if you include cross-object matching in duplicate rules.
  • Web-to-lead forms are your friend. They can be embedded right on your website, and you don’t have to do any custom field mapping, so they are great for a super basic form. You can also use FormAssembly for your more complex forms, which handles duplicates and multiple object touches a bit better.

So what are you waiting for? Check out the Trailhead modules on Leads (here and here), do a little Sandbox testing, and get to it!

Apsona: a Salesforce Admin’s BFF

I hajerrymaguired the honor of presenting at the Bay Area Salesforce Nonprofit User Group this week on Apsona, one of my absolute favorite Salesforce productivity apps. For the uninitiated, Apsona is a browser-based data uploader tool for Salesforce, but really it’s so much more than that. Others have written many a love poem to Apsona (here, here, and here for just a small sampling!) so I won’t do a big overview. Those of you who already use Apsona know that it can do some amazing stuff.

Did you know that you can access a lot of obscure Salesforce objects through Apsona, like Chatter Group memberships, Public Group memberships, and Permission Set assignments? Let’s talk about Chatter first.

Bulk Adding Chatter Group Members

In order to users to Chatter groups, you navigate to your group, click Add/Remove members, find the user, click Add. Easy enough. Unless you’re adding more than, say, 10 users, and then it gets pretty annoying. To add users through Apsona:

You’ll need two excel columns: one for your user ID (or user’s full name, assuming it’s unique), and one for your group ID (or your group name, assuming it’s unique). You can find your group ID by going to your group and copying the 15 digit ID right at the end of the url.

bulk add chatter group membersNext, you’ll need to add the Group Member object in Apsona. In Apsona, navigate to Settings >> Configurations, and open up the System Administrator settings to edit. Note: there are currently two objects called Group Member. One is for Chatter group members and the other is for Public group members. Add them both because it’s impossible to differentiate between them from here! Add them to your visible objects, and then to your menu bar. Click Save, and then Settings >> Clear cache so you can actually see the objects.

Click on the first ‘Group Member’ tab – if you see Collaboration: [name of Chatter group], you’re in right object! Proceed with your import and upload. Your upload is actually creating new records, so tell the system to reject duplicates. Select ‘Create new’ for match fields, and select Collaboration Group and Member. Essentially, you are telling the system not to add the user to the group if that user is already IN the group.

match fields

Click next, and complete your upload. That’s it!

Bulk Adding and Reporting on Public Group Membership

The process for adding users to public groups is essentially the same as Chatter groups, except you are looking for the other ‘Group Member’ object. You need two columns like above, one for the user and one for the group. Proceed as above.

One other nice Apsona feature with Public Groups is that it is currently not possible to report on Public Group membership in a Salesforce report. But you can do so in Apsona, using filters and the export function within your object tab. From here, you can get a basic report of your public group memberships.

Bulk Assigning and Reporting on Permission Set Assignments

permission set assignmentsSure, you could download a special app to help you deal with your permission sets, but why not use an existing tool for this? Add the Permission Set Assignment object to your menu following the same steps as above – Permission Set Assignment is the object connecting Users to Permission Sets. Again, two columns, one for your user and one for your permission set. And similar to Public Groups, you can also use Apsona to filter on and export out your permission set assignments!

Got any other cool stuff you’re doing with Apsona? Please share in the comments!

Now we’re…

managing data like a boss

New User Actions with Flow and Process Builder, or, I Slayed the Visual Workflow Dragon!

For a button-click administrator like me, the introduction of Lightning Process Builder was life-changing. I’ve been creating records, updating multiple fields, and kicking off multiple email alerts like a boss! At Dreamforce, I presented on “Tips and Tricks for Nonprofit Administrators,” which included a lesson on using Process Builder to automatically add users to Chatter groups based on data from the User record. Huzzah!

OK, so when I discovered the above was possible a few months ago, I went nutty with the Chatter group adds, and then I thought, why can’t we do this with Public Groups? YES WE CAN. Add a new Process? Don’t mind if I do! Then, a third one for permission sets. I rule all!

Wait, no. Somewhere in there the errors started, and all three of these processes stopped working, and I was sad and really busy so I deactivated and ignored for a few weeks.

IMG_3480At Dreamforce, I attended a session presented by Ashima Saigal and Margaret Fako about Process Builder and Flow (p.s. you can now see the video from their session!). I got a lot out of learning about their trial-and-error process in reaching their solution, and about how much more granular and fine-tuned you can be using a flow (rather than a process) for all the details of your automation. Feeling inspired, I got to work on putting all three of those pieces of automation – auto-assigning Chatter Group membership, Public Group membership, and Permission Sets upon creation of a user – into a single flow, kicked off by a process.

I’ll start with some quick flow newbie tips to save y’all some time in the future!

  1. Use a clean sandbox. I was originally using my organization’s only full sandbox to test, which hadn’t been refreshed in a couple months. Flows can have errors coming out of every unpredictable crevice of your org, and the cleaner the environment, the easier and quicker time you’ll have troubleshooting. I refreshed a new sandbox and started from scratch, which eliminated one of the errors I was seeing the first time around.
  2. The magic happens in the record lookup. OK, I know this is a gross overgeneralization because there are a million things you can do with flow, and clearly a lot of stuff happens elsewhere, but the crucial piece that I didn’t get when I started is that you need your Record Lookup component to pull every field you need to reference later on in the flow as a variable. Now I say DUH – and you might say duh – but this is a key point I feel like I need to make for my fellow novices. If your variables are pulling the right data, you are halfway there!
  3. Add flow components one at a time, and test in between each one. Might seem time consuming but makes it a lot simpler to locate errors along the way and fix them as you go.
  4. Use your resources, like the amazing, stupendous, Power of Us HubHow much do I love all of the amazing people who gave me great tips and helped me not only do what I needed to do, but helped me understand how flow works and why the errors I was getting might have been happening! If you have a hub login, check out the thread. When you start asking your own questions on the Hub or the Success Community, screenshot the crap out of your post. No one can help you unless they see what you’re doing under the hood. Another great resource is the Visual Workflow workbook, which has some great overview info and provides examples for flows and flow components.

Let’s get to it! Here’s the beautiful flow, which I pushed to my production environment yesterday. I’m tempted to make this my Facebook cover photo.

New User Actions flow - final

Record Lookup. We’re looking up the User object, and we’re pulling all the fields we need or might need as new variables (which we are creating as we go).

Record Lookup

Decision. The first action we’re going to take here is based on the Profile of the User. In my testing, I found that for some reason, flow was having a hard time with the Profile ID field, so I created a custom formula text field to just pull the name of the profile. Easy enough.

Profile Decision

Record Create. We’re looking at three different profiles, two of which will indicate that the user needs to be added to a Public Group, and one of which needs to be assigned a permission set. Afterwards, the users with the former two profiles need a different permission set. All three of my actions need the Record Create element. The record you are creating for Public Groups is GroupMember; for Permission Set Assignments it’s PermissionSetAssignment; and for Chatter Group Membership it’s CollaborationGroupMember. The Record Create elements for all three are quite simple: you need the ID of the user (in this case, it’s my variable) and the ID of the group or permission set.

Record Create - Pub Group

Next, permission sets. You might be wondering why we don’t just add the permissions directly to the profile if we are assigning permission sets based on profile. You would be right to wonder. The reasoning is too long and complicated to get into here. But here’s what the Record Create looks like for it.

Record Create - Perm Set

So now, the Wait Element. This was the trickiest part for me. Chatter Group membership and User together are one of the pesky object combinations that cause DML errors. I’m not a developer but you can read all about these fun things here! Essentially, we need to have the flow wait a moment to ensure that the User has been created before proceeding with the Chatter membership add, or else we’ll get a mixed-DML error message, which reads something like, we can’t add this user to this group because the user doesn’t exist yet. A wait element will cure all your DML ails! This Wait element waits 1 hour following the Current Date/time that the flow ran before adding the Chatter members. I figured this piece out with the Visual Workflow workbook, by the way.

Wait Element

Now that our flow knows to wait, we can proceed with our Chatter adds. Our Chatter adds are based on a custom field on our User object called Site. We do have sites that don’t have their own Chatter groups – those users are simply getting added to the All Staff Chatter groups, of which there are two down at the end of the flow. Everyone else gets added to those groups as well, after they’ve been added to their respective site’s group.

Chatter Adds overview

Finally, tying everything together is the Process that actually kicks off the flow. Two crucial points here: 1) This process uses a wait element of 0 hours after creation for the action. Ask a developer why because I have no idea. Probably a mixed DML issue. I just know it works, and kicking off the action as immediate doesn’t! 2) It references the User variable from my flow – this is so that your process knows on which user to perform the action.

New User Actions Process

IMG_3479My biggest takeaway here: Process Builder is a wonderful tool that I will continue to use when the actions are relatively straightforward. However, when you have multiple actions taking place with different IF/THEN statements, or if you need your process to wait in the middle without having another blue diamond, or you need granularity or more control of each action, flows are your new best friend! Get cracking!

Lessons From a First-Time Dreamforce Presenter

bitmoji-20150918155130It’s done and over! I got over a major professional hurdle and presented a fantastic session at #DF15: #AwesomeAdmin Hacks: Tips and Tricks for Nonprofit Administrators. So far the feedback has been positive and I felt great about how both sessions went (we did the same one twice). I wanted to write out a few lessons learned before this whole week is just WHOOSH gone.

Anyone can do it. I mean a few things by this. I was kind of terrified to speak in front of this many people, as I’ve attended Dreamforce for years and watched the slick, highly controlled presentations and presenters wearing madonna mikes and never once did it occur to me that I was actually capable of doing just that. I also mean, we Salesforce admins and power users, particularly in nonprofit settings, have A LOT to offer at Dreamforce. We are doing creative, innovative things with every tool at our disposal, and have so many stories, tips, and advice to share with our colleagues and extended community at Dreamforce.

Don’t get too technical. These sessions are so short. Even if you are presenting a technical solution, don’t get too deep into detail on the steps. You’re not doing a training. If an attendee sees something they want to try in their org, they can find resources and screenshots in the session’s Chatter feed, do some googling, or contact you after Dreamforce. Dreamforce sessions essentially consist of storytelling. Tell some stories, and tell them well! The rest happens afterwards.

Practice makes perfect. It’s true. I reviewed, revised, and ran through that presentation so many times I basically had it memorized. Which meant that when I got up there, adrenaline pumping through me, all the practicing is what got me through. The part of my brain that talks to one or two people shut off and some new, unfamiliar part kicked in that retrieved everything I had practiced and sent it to my mouth and projected it out to a crowd. Somehow. I’m sure some scientist could explain it but it was both amazing and useful.

Use all of your resources. I ran through all of my content with my co-presenters and my work team and then revised my presentation based on their feedback. I also solicited feedback from people who didn’t know the first thing about Salesforce but knew public speaking and pedagogy. Even people who don’t understand fully (or even partially) your content will be able to give you feedback – and if nothing else, they provide another audience for another practice round. Make yourself vulnerable, identify your needs and blind spots, and reach out for help.

High FiveDo what you know and what makes you happy. This means both when choosing the content of your presentation and the visuals in your PowerPoint. I’ve been pretty obsessed with the Bitmoji app, so my presentation was full of cartoons bearing my likeness. It’s fun and entertaining and most important, it gets ME enthused, and then I’m an even more enthusiastic presenter!

Lastly: have fun. I didn’t think this one would be possible. After all of your hard work choosing great content, creating eye-catching and entertaining visuals, and practicing your heart out, you get to cash in. Attendees watching youbitmoji-20150918155948r presentation will get more out of it if you look like you are genuinely having a good time.

I hope I have the opportunity to present at #DF16! But first, sleep.

Implementing Salesforce for Volunteer Users

Volunteers are often the heart and soul of small nonprofits – they put in their blood, sweat, and tears, they don’t get paid, and they are happy to be contributing their time towards something they believe in! When those small nonprofits are using Salesforce, very often so are their volunteers. When your user base includes lots of volunteers, there are a number of things to consider – and a number of things you might do a little differently than if your user base is paid staff. What’s the difference?

Volunteers:

  • Don’t have as much time for training
  • Don’t do the work as frequently or regularly as paid staff
  • Have varying experience with and background in technology and databases
  • Are often working at off-hours, when either you as the Salesforce implementer/administrator/trainer are not working, and/or the organization’s paid staff are not working

Some considerations for Salesforce implementations and support for volunteers:

Be realistic about what’s feasible – and what’s not

A few years ago, I implemented Salesforce pro bono for a small nonprofit with a single paid staff person and a fleet of volunteers. This was an organization whose work was based around community organizing, and as such, the staff person and volunteers all conducted many 1:1 relational meetings. Salesforce Activities would be perfect for documenting these, I thought! When I presented them to the Executive Director, however, she rejected the idea. “It’s cool, but we won’t keep up with it. Maybe sometime down the line.” Lesson learned, and I’m so glad this ED was far more realistic than I in that moment! One mistake to avoid here is not to implement something that the organization’s users do not have real time to learn or the ability to maintain, despite the temptation of Salesforce providing countless out-of-the-box solutions for a range of business needs. For many small nonprofits with volunteer users, the initial Salesforce buildout itself can be simple and straightforward, while more time may be spent on training and documentation than in other implementations.

Security and permissions – more important than ever!

Many people believe that smaller organizations are less in need of Salesforce’s built in security and permission features. And sometimes, that is true! However, when your users are all volunteers, it is essential to make the system as foolproof as possible. Because of time constraints and scheduling difficulty, volunteers generally receive minimal live training, and may be rotating in and out fairly frequently. Do them a favor and make it impossible for them to mess anything up! Their Salesforce tasks should be outlined clearly and they should be assigned profiles that only allow them to see/modify the data they need to see/modify and do the tasks they need to do. Implement validation rules as needed. For example, volunteers doing data entry of Contacts from an event do not need to be able to edit Opportunities (in some cases they don’t even need to see Opportunities). If your Contact object has hundreds of custom fields, perhaps create a profile for those volunteers that only has the key fields they need to work with. Doing this work ahead of time can save your volunteers and paid staff time and headaches, not to mention saving the organization money that they might have paid you or another consultant to help clean up bad data or recover missing data.

Prevent duplicates

From day 1, set up Salesforce’s Duplicate Management feature (released Spring ’15). It is fairly simple and straightforward to set up, and your volunteers will thank you for helping them not reinvent the wheel or enter bad/repeat data in the system.

Foolproof documentation is key

Work with your main contact person to create guides, whether written out or in short videos, to document key business processes the volunteers will need to work through in Salesforce. Tools like Crowdguide and Screensteps can be particularly useful here, as they provide embedded guides of different styles to walk your users through a process. If there’s no budget for a documentation tool, use Salesforce Solutions or just a Word doc – whatever can be shared and updated easily!

Train your paid staff person (or main contact person, if they are a volunteer) to make basic administrative changes

Your staff member does not need to be a fancy dancy 5x certified Salesforce professional, but they should know enough of the basics and be familiar enough with the Setup Menu that they can understand how objects relate to one another, where custom fields can be edited and created, how to modify page layouts, and how to create and modify reports. If they are particularly savvy, you can introduce validation and workflow as well. Given the size of the organization and the fact that they have so many volunteers, I’m going to go out on a limb here and guess that their budget for ongoing Salesforce support is pretty minimal. Make it as easy as possible for them to make changes on their own before they have to reach out to you.

Set up some basic data quality reports

Now that you’ve set up your security and permissions, documentation, trainings, and duplicate prevention, set up some reports to help the organization monitor the quality of the data. Have the report/s emailed on a weekly or monthly basis to your main contact person, paid staff person, or the person you trained to do basic administration. If after reviewing these reports, that person is seeing major data quality issues, revisit validation rules, training, documentation, and permissions and adjust as needed.

Volunteers rule! Give them the easiest, most foolproof system and keep them and the organization’s time and money focused on their mission, not on cleaning up data. Have more tips for implementing Salesforce for volunteer users? Please leave them in the comments!

Why This Nonprofit Admin is Excited About #DF15

It’s hard to believe that this year will be my 5th Dreamforce. The newbie outsider feeling I had in 2010 still feels fresh sometimes, until I remember all the amazing resources and sessions for nonprofit admins that have been built up and prioritized since that time! The short version, repeat after me: you are not alone.

1. Small But Mighty

bitmoji-20150805142522This phrase did not exist as a widely-used catchphrase in Dreamforce land 5 years ago. I was a part-time solo admin at a tiny nonprofit, and convinced my manager that it was a priority for me to attend Dreamforce. I distinctly remember attending several sessions that I was PSYCHED about when I read the session abstract, only to discover when I attended that the fancy functionality/application/business process being presented was custom built by a consultant at the cost of tens of thousands of dollars. I thought to myself, I thought the whole point of Saleforce for nonprofits was that it was supposed to be inexpensive? I know this tool can do more than I’m currently doing with it, but how do I find out what it can do?

Fast-forward to 2015, resources abound for the budget-conscious yet nimble Small and Mighty nonprofits, including a group in the Power of Us Hub, a podcast dedicated almost exclusively to issues relating to Small and Might nonprofits, and plenty of Dreamforce sessions to hone your skills as the sharpest, savviest Salesforce admin on the small nonprofit block. Salesforce itself is even friendlier than it used to be to the solo admin, especially with the introduction of Process Builder, new in winter ’15, which allows administrators to do a lot of cool button-click stuff that used to be reserved for custom development alone. And of course, there are a number of Dreamforce sessions on learning Process Builder and doing awesome, powerful things with it!

2. Power of Us Hub Comes to Life

power-of-us-hubSince its founding, the Power of Us hub has grown to be a vibrant, knowledgeable community of nonprofit and Salesforce professionals. I was a lurker on the old NPSP google group, mostly because I was so overwhelmed and intimidated by the format and never quite figured out how to jump in and ask questions, let alone answer anyone else’s. The Hub is a place to understand Salesforce better, learn about new and upcoming releases and patches to the NPSP and other nonprofit packages, and most of all, not feel totally alone in your work! Many of us who are solo admins or consultants don’t have coworkers who fully understand how we fill our days or what our struggles are – or can serve as colleagues to discuss issues with or bounce ideas off of. And Dreamforce is where all of those people show up, in person, to be real human beings, in the flesh! Hurray! They are there to share their knowledge through Dreamforce sessions, network, and learn. I can’t wait to see those I haven’t seen since last year, and connect with those I’ve never met in person.

3. 2015 Feels like the most Admin-Friendly DF Yet!

Dreamforce 2014 - home at last at Moscone West
Dreamforce 2014 – home at last at Moscone West

Wow, there are just so many resources and sessions for us administrators at Dreamforce, including sessions for beginner admins, solo admins, admins who want to learn code, other HOTs, live podcasts from the admin zone, dedicated Trailhead workshops, and more! The Admin Zone premiered at DF14 and I felt immediately at home (OK, the superhero posters and buttons might have helped a bit). Last year I got some great tips at the admin zone, including some on how to improve my end-user training that I still find useful. This year, there’s also a dedicated Admin Day (Thursday the 17th) and our own dedicated keynote.

You are not alone, administrators! See you at Dreamforce!

Salesforce Admin Hack: Temp Fields

I ❤ temp fields! Temp fields are simple text fields, used mainly by administrators (though I have given access to superusers on a few occasions), to quickly and temporarily tag records with dummy text so you can easily locate those records later in a Salesforce report, an Apsona filter, in Demand Tools‘ Single Table Dedupe, the Apex Data Loader, or anywhere else where you can filter a Salesforce field. Here are a few ways temp fields can be useful and make you an even more #AwesomeAdmin.

To test out the examples below, start by creating your temp field. The examples below are on the Contact object but you can create a temp field in any object where it might be useful. Call it whatever you like as long as you know where to find it (“Temp Field,” “Temp Field 1” if you have more than one, etc.). Make it a simple text field, 50ish character count. Make sure that you make the field read-only for all users aside from those who should be updating these fields.

Tag a Group of Records for Easier Reporting

Let’s say a user has given you an Excel spreadsheet with a list of Salesforce IDs, or email addresses, or phone numbers, or names. Maybe the spreadsheet has IDs, maybe it doesn’t. The user wants to be able to run a Salesforce report on these people: their donation history, campaigns they are a part of, etc. The problem is, no Salesforce report filters will be able to match this list exactly because it was generated by the user, or because they took an old Salesforce report and deleted some contacts and added some new ones.

If you have the IDs: make sure the temp field you created is available in Apsona by clearing your cache after adding the field. Next, add a new column to your spreadsheet with the name of your temp field as the header. Choose any value for the field as long as it’s the same for every record. My personal best practice is to insert the date into the end of the field value so if I stumble on it later, I can remember when I used it, which will (hopefully) remind me why I used it and whether it can be cleared or overwritten. Your spreadsheet will look something this this:

TempTest0719

Copy and paste into Apsona like you are doing a record update – all you are doing is updating this one field. Afterwards, add Temp Field = TempTest0719 (or whatever your value is) as a filter in any Contacts report, and send to your user. Once you are done, clear the temp field or just leave it alone until you need to make your next update – with your next update, you’ll simply overwrite what’s already there. (that’s when having a date in the value comes in handy). See below regarding clearing the field.

If you don’t have the IDs: don’t forget that in Apsona, you can map on more than just Record ID: you can also use email, name, name in combination with address, and more. You can follow the same process as above with what you have, or if you have a mix of those different things, run each one through Apsona separately and use the backup file, which contains IDs, to do your final upload.

Merge records with Demand Tools

If you have used Demand Tools’ Single Table Dedupe function, you know it can be confusing and slightly terrifying (am I sure I want to merge all of these records with no backup??? No, not when you say it so ominously!). The UI is not the best; if you’ve pulled in the wrong fields to review, you have to keep adding them afterwards; it’s difficult to look at all the data you need to look at at once to make an informed decision about whether you are merging the right records or not; you can’t find the scenario you were working on last week, etc. Or maybe you already have created a complex Salesforce report, exported it to Excel, and don’t feel like going through the steps of carefully re-creating all of the conditions in Single Table Dedupe’s UI. For whatever the reason, I have often found it easier to review this data in a Salesforce report, either within the Salesforce UI or exported to Excel, where you can sort and filter. My favorite way to safely merge records using Single Table Dedupe is with a temp field. Once I have finalized my list of records that I want to merge, I’ll do similar to what you see in the example above, but I don’t put the exact same value in the temp field. Let’s say I’m merging contacts: my temp field upload might look something like this:

TempTestMergeRecords0719

My temp field value starts with Merge0719 but has the last name of the contact appended. Once I am in Single Table Dedupe, I can simple add a condition in step 1: Temp Field starts with Merge0719:

SingleTableDedupeFilter

Since you have already done your work in Salesforce or Excel to determine which records you want to merge, your only mapping condition in Step 2 (selecting fields to match) will be your temp field:

SingleTableDedupeMap

On the next screen, your records will display grouped accordingly. From here, determine your master rule to tell the system how to decide which record should be the master, test one to start and verify that the merge went as expected, and then do the rest. Clear your temp field from the master record after you’re finished.

Clearing a Temp Field

My best practice is to clear a temp field after I’ve finished using it to avoid future confusion. Create an Apsona filter Temp Field = your value, and update all records in the filter to Temp Field = blank. You’re finished!

There are countless use cases for temp fields, especially with Apsona and Demand Tools at your fingertips. Apsona, in particular, makes updating records such a breeze that I use temp fields multiple times a week. Do you use them? If so, please share your use cases!

Making the Case for Documentation

It seems appropriate that my first post on this new blog would be about documentation. How meta! When I say documentation here, I’m focusing on documenting what’s happening in the setup menu for the benefit of anyone searching or trying to make sense of administrative settings, though much of this applies to different kinds of documentation.

I have thought about this topic so many times since starting at my most recent job as a Salesforce Administrator at Year Up, a large nonprofit organization with 600 (and counting) active Salesforce users and a dedicated team of 7 working on current and future Salesforce functionality. Why is documentation so important in a Salesforce setup environment?

Perhaps the most obvious: no one knows exactly what you’re doing or why, except you

None of us works in a bubble, even when we are a rockstar solo admin. If we rock enough, we’ll head off to a bigger, brighter organization after some time. And someone’s going to have to know why you did what you did.

Sometimes even you don’t know why you did something

Right in the moment you think, this makes total sense! And I need to do this task and move on so I can get on with my busy day. And some time later, you stumble on that same formula field and cannot remember why you put it there. This morning my co-admin asked me why I created a particular Public Group six months ago. Now, I remembered creating the group, and I remembered that there was an actual reason for it. I went digging through the helpdesk ticket archive, sharing rules, report folders. Nothing. Oops. Could have prevented this one, easily, with some simple documentation.

Nonprofit Salesforce setup can be complex

When you’re building custom fields, workflows, validation rules, and processes that are specific to your organization’s mission, program, and business processes, things that start off seeming fairly obvious can get obscure pretty quickly once you’ve gathered your requirements from your staff and started building. Furthermore, if you’re paying a developer write a trigger for you, or you’re an #AwesomeDeveloper and are writing it yourself like a rockstar, I can tell you for certain that no one knows what that thing does besides you. And I’m sure it does a lot of cool stuff, because it’s custom coded.

Data is flying in from everywhere!

Where did this data come from? Was a big mantra at my last system administrator job. We had data generating and updating from webforms, a gift processing vendor, custom apex code, and the Rollup Helper application, not to mention from our own users. If you have a field only being updated by one of those groups, put it in the field description! We incorporated this as standard procedure for adding new rollups. The description would read something like:

Populated by rollup helper {insert link to rollup details here}.

Simple as that. That way, when you, a fellow administrator, your successor, or anyone else with admin access goes into the setup menu to understand what the field means, they can find out easily and quickly.

So why is it worth our time, and therefore our money, to do this?

The short answer to this one is that a little bit of time invested at the beginning can save hours of time later on. Not prioritizing documentation is taking a short-sighted view of Salesforce implementation and maintenance. Helping yourself – or your coworker or successor – remember or understand what you did can prevent the frustration and time of digging through the setup menu for an afternoon, running 5 reports, calling vendor helpdesks, deleting something important (because no one understands its importance), or reinventing the wheel by putting something in the system that might already be there with a different name but no description.

But I’m using a consultant, and they’re doing all of our buildout for us!

The case for documentation might be even stronger if you’re working with an implementation partner. They’re building stuff for you – make sure they give you some documentation for what they did, and why! It will likely save you hours of time and headaches later. Remember, Salesforce implementation is an ongoing process, not a one-shot deal. The more your consultant documents, the less likely it is that you’ll have to call them again and again to ask questions or modify something after the solution has been implemented.

Where should I put it?

Anywhere where it will be easy to find, search, and update. Use description fields everywhere you go and make it a standard part of adding any new field, workflow, validation rule, etc. If we’re talking lots of complexity, like a custom object, use Salesforce Solutions! Start a wiki! Use your organization’s intranet, if you like it and it meets the criteria above (easy to find, search, and update). Start a Word doc or a google doc!

Last tip: documenting does not have to be wordy or complex. Outline the basics of whatever you built. Your reader will thank you for your brevity – because it will make their job easier. And with that, happy documenting!